Low Budget Terrace Construction
This terrace construction idea uses timber. It is very neat and will fit in with timber garden walls. It may also be painted to complement the architecture of your home.
Materials
Sawn treated fence posts (75 x 75mm x 2.4m, or 3 x 3 inch x 2.7 yard)
Sawn treated planks (25 x 150mm x 2.4m, or 1 x 6 inch x 2.7 yard)
Colonial hand rail (31 x 83 x 2.4m)
Wood screws, countersunk, zinc plated (5M x 60mm or 2.5 inch)
Builder’s plastic sheeting
Stones and pebble
Sand
Terrace Construction Design
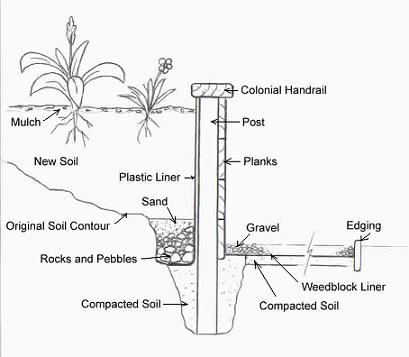
Fence posts are planted 1.2 meters apart (centre to center). Plant depth must be at least 450mm. The planks are screwed onto these posts. The inside of the terrace has a drainage furrow. This drains off excess water. Builder’s plastic placed against the inside of the timber, keeps moisture away from the timber. This prevents the wood from rotting. The basic design is shown below.

Section of Terrace Construction Design
Getting the Materials
First determine how much material you need. Measure the length of the required terrace. Divide this length by 2.4 meters. This will give you the number of plank sections to be used. Decide how high you want the terrace to be. I suggest you keep it to a maximum of 60 cm (600mm).
Each plank is 150 mm wide. This means that you can have your terrace say 300mm, 450mm, or 600mm high. Depending on how many planks you place on top of one another. The total number of planks will be the number of plank sections times the number of planks required for the height.
For example a 4.8 meter long terrace 600mm high will require 8 planks (2 for length x 4 for height = 8). Adjoining planks are screwed onto the same post.
The posts will be planted 1.2 meters apart (i.e. one at each end and one in the middle of each plank.) For our example above, you will need 5 posts (one at the start and then two for each plank length). The length of each post will be 1,05 meters (600 mm plus 450 for planting).
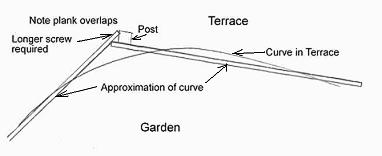
If you have a curve in the terrace construction, you will have to saw the planks in half to approximate the curve. See the sketch below. You will also need longer screws to secure some of the planks.

Terrace Construction - Curve Approximation
Make provision for drainage at the lowest point of your terrace construction. Here is a sketch of the terrace drainage design . Note that the bottom plank must be 220mm shorter for the hole. Let the supplier of the timber cut your timber to the correct lengths. Just make sure you planned it properly before you cut it!
Terrace Installation
Measure out the exact position of each post. Dig a furrow for the drainage between all the post positions. Dig a hole for each post to the correct depth.
Place a post in each hole. Make sure that all the holes are the correct depth. Do this by holding two adjacent posts upright, placing a straight plank over the top of both, and checking with a spirit level. Adjust the depth of the holes until everything is level.
Start on the one side of the terrace. Position the top plank flush with the edge and top of the post. Drill a pilot hole and screw in one screw only at this time. Next fix it to the post situated at the end of the plank.
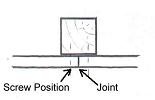
Align the plank level with the top of the post, but only to the middle of the post to allow the next plank to but join with it. See below. Again only use 1 screw near the top of the plank.

Continue in this fashion until all the top planks are in place. Note at this stage the posts will still be loose in their holes. Go back and after properly aligning each post, insert the second screw.
Fill and compact each post. Now fix all the other planks from the top down. When all the planks have been secured, fit the colonial handrail on the top. The timber work on terrace construction is now complete.
Clear the drainage furrow. Starting at the lowest point hang builder’s plastic down on the inside of the terrace construction. Tack the plastic in a few places at the top to keep it in position.
Lay the next sheet of plastic and let if overhang 150mm over the previous plastic sheet. Continue until the whole terrace is covered on the inside. Complete the drainage by placing large stones and or pebbles in the bottom of the furrow. Cover this with a layer of sand. Fill the terrace with soil. Water the terrace down and leave the soil to settle. Do not compact the soil.
You may now finish the garden in front of the terrace construction. Paint the terrace to fit in with the garden, house and surroundings. Place a pot or plant in front of the drainage hole to hide it. You may likewise soften other corners of the construction.
After all this work, get a garden chair, sit down and relax. Enjoy the satisfaction of seeing your new terrace and start dreaming of the nice plants you will be planting there!
Container Gardening will complement your Terrace
Return from Terrace Construction to Design Gardens Home Page
Attention: This is limited to the next 7 lucky individuals
“The FREE Shed Plan and Garden Improvement Project ”


